30-Day Squat Challenge

Need a squat challenge to build a better backside? How about a program that is designed for gradual muscle development and a leaner, lower body?
Not every squat program is built for progressive results. But this 30-day squat challenge starts with foundational exercises and adds targeted challenges that not only build a sexy booty, but also improve postural alignment, core strength, and functional stability so that it's easier to keep your hard-earned results.
Ready to get started? Begin by reviewing proper squat form. Then read through the tips for making it through all 30 days of the squat challenge. Finally, consider printing out the schedule or bookmark this page so you have instructions handy for each day's routine.
How to Perform the Perfect Squat
Begin with your feet parallel and slightly wider than hip distance apart. Stand tall with your shoulders relaxed, knees soft, and pelvis properly aligned (not tipped forward or back). If you've never done squats before, it may be helpful to have a chair behind you to act as a target.
- Shift your weight back slightly into the heels, hinge at the hips, and begin to lower your weight toward the chair (or the wall behind you) as if you are about to sit down. Both the hips and the knees should bend simultaneously during this downward phase.
- As you lower your body, keep your spine long and your core engaged so your lower back doesn't arch or curve into a hunched position.
- If you notice your knees bending forward beyond your toes, pull your weight back slightly so the weight is in your heels and there is less pressure on your knees and shins.
- Keep your legs aligned so that it doesn't feel like your knees are falling in or rolling out.
- The bottom of the squat is when your booty touches the chair (beginning level), when your heels begin to lift off the floor (intermediate level), or when your thighs are parallel to the floor (advanced level).
- Keep the shoulders relaxed and core engaged as you return to the starting position. Hips and knees will move simultaneously on the upward phase as they did on the downward phase.
As you perform each squat repetition, breath comfortably and try to keep the movement continuous and fluid.
Some of the exercises that you'll do during this 30-day squat challenge will require that you change your foot stance. But try to maintain good posture (long spine, relaxed shoulders, neutral pelvis) throughout each exercise.
Tips to Get the Best Results
Consistency is key to when you're trying to build a better booty. Use these tips to stay committed.
- Do your exercises at the same time every day: Studies have shown that morning exercisers are more consistent, so consider doing your routine shortly after rising. If you choose to do your routine in the afternoon or evening, set an alarm and stick to the plan.
- Don't worry if you don't do the exact exercises prescribed: The program is designed with a specific progression in mind, but if you forget what you are supposed to do on a given day, it's better to do something than nothing at all
- Add cross training activities: You'll get the best results from this (or any) squat challenge if you practice healthy eating and activity habits all month. If you're new to exercise or if you've been sedentary for a while, you don't have to participate in hardcore cardio. But you can set a step goal each day to increase non-exercise activity and add a few fun easy workouts (like a bike ride or a hike) to burn additional fat and calories. A balanced diet full of fruits, vegetables, lean protein, and whole grains will help as well.
Lastly, remember that starting any exercise may result in some muscle soreness, but you should never feel pain. If you're new to exercise or if you feel pain when you move, talk to your health care provider to get personalized advice.
Week One
During the first week of the squat challenge, you'll focus on form. Why? Because sloppy squats not only waste your precious workout time but they create misaligned muscle memory that can haunt you for years.
So even if you consider yourself to be a pro-squatter, you're going to use this first week to fine-tune your body mechanics to make the most of the more advanced exercises you'll be doing later in the month. If you're an advanced exerciser and you want to add a challenge, either double the reps, add weight (dumbbells), or do both.
Pro Tip
Use a full-length mirror to check your form. Rotate your body position every few reps to check your alignment from all angles. If you have a fellow exerciser in the house, you can even ask them for feedback.
Week One Exercises: Focus on Perfect Form
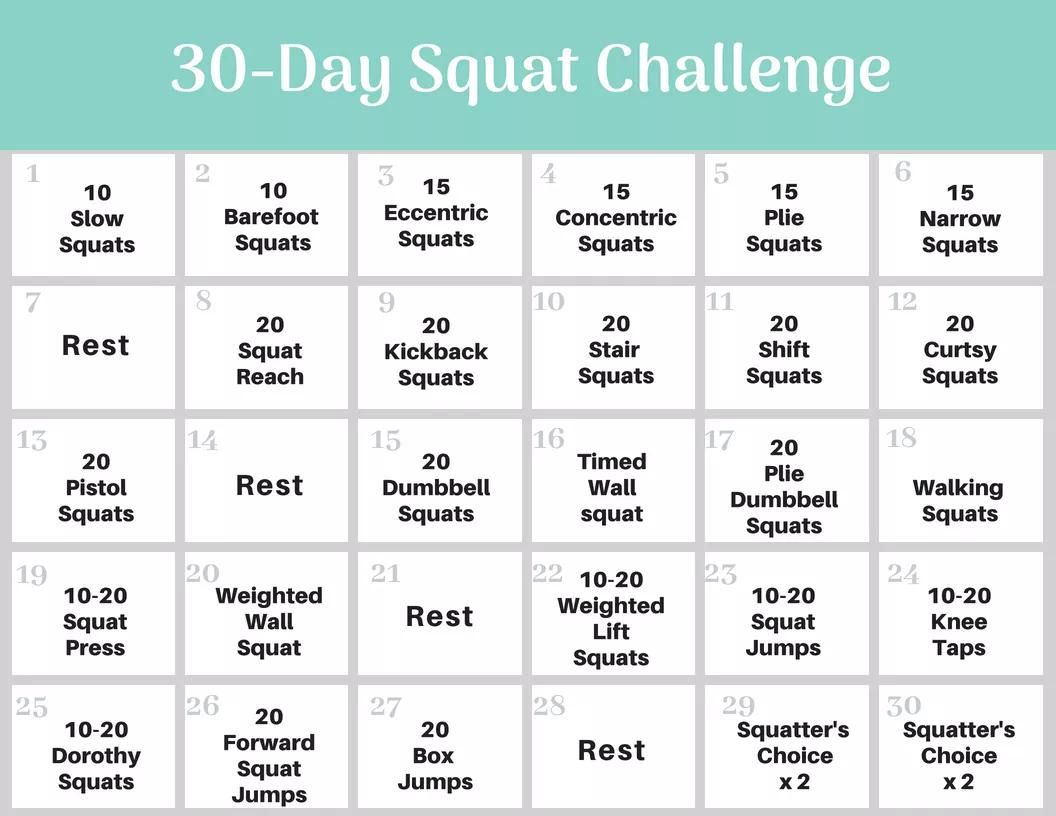
- Day 1 - Slow squats: Count from 1–5 slowly on the downward phase of the squat and then count to 5 slowly as you return to the starting position. Focus on perfect form. Repeat 10 times.
- Day 2 - Barefoot squats: Do slow squats without shoes on. Keep weight evenly distributed throughout the feet and toes relaxed. Pay attention to where you feel the weight in your feet. As you move, your toes should never grip and you should feel strong through your heels. Weight should be evenly distributed across the foot so you're not rolling in or out on your arches. Repeat 10 times.
- Day 3 - Eccentric squats: Count from 1–5 slowly to lower your body into the squat position. Then return to standing in one count and repeat. Focus on the eccentric contraction, or lowering phase. Repeat 15 times.
- Day 4 - Concentric squats: Start in a (lowered) squat position. Count from 1–5 slowly to bring your body to a standing position. Then return to your squat position in one count and repeat. Focus on the concentric contraction, or lifting phase. Repeat 15 times.
- Day 5 - Plie squat: Start with feet wider than hip distance apart and toes rotated out (in a "V" position). Lower the hips down and slightly back, then return to the starting position. Repeat 15 times.
- Day 6 - Narrow squat: Place parallel feet closer together so that they are almost touching. Complete twenty squats maintaining this foot stance. Repeat 15 times.
- Day 7 - Rest
Week Two
During week two, you'll add postural changes and balance challenges to your squat workouts. By changing your foot stance or shifting your weight to one side or the other, you become aware of—and begin to eliminate—muscular imbalances. The result? A more functionally aligned body and a stronger core.
Pro Tip
Use a bar or a countertop as needed if you need something to hold on to. Do the first few exercises with support, then try to challenge yourself to do a few without support.
Week Two Exercises: Add Balance to Enhance Training
- Day 8 - Squat reach: Complete a full squat, but as you finish the lifting phase, reach the arms overhead so that your heels lift off the floor. Engage your core muscles to hold the lifted position for one second. Repeat 20 times.
- Day 9 - Kickback squat: Complete a full squat but as you complete the lifting phase, extend the right heel back and off the floor as if you are kicking the wall behind you. Repeat 10 times on the right and 10 times on the left.
- Day 10 - Stair squat: With feet hip distance apart, place one foot on a stair (or a slightly elevated surface). Complete 10 squat repetitions in this uneven position, then do 10 more with the other foot elevated on the stair.
- Day 11 - Weight shift squat: Start with feet wide. Shift your weight to the right so that you can take weight off the left foot (but keep the toes on the ground for balance). Complete 10 squats with weight shifted right and 10 squats with weight shifted left.
- Day 12 - Curtsy squats: During the lowering phase of your squat, pull the right foot behind the left into a curtsy position. Repeat on the left. Complete 20 squats alternating sides.
- Day 13 - Single leg (pistol) squat: In a narrow squat stance, lift the right foot off the floor and complete 10 squats using only the left leg. Repeat on the other side.
- Day 14 - Rest
Week Three
Now that you've fine-tuned your form and balanced your body, it's time to overload your muscles to build strength and shape a sexy backside. You'll add resistance by holding the squat position longer (isometric contraction) or by adding resistance in the form of weight.
Pro Tip
Some of these exercises require a dumbbell. If you're just starting out, err on the light side. A 2- to 5-pound weight is sufficient. More advanced exercises can use 5 to 8 pounds or more.
If you don't have a weight, use a household item, such as a bag of rice, a bag of potatoes, or a sack of oranges.
Week Three Exercises: Add Resistance to Overload Muscle
- Day 15 - Dumbbell squat: Place one dumbbell in each hand. Complete weighted squats maintaining good posture. Complete 20 repetitions.
- Day 16 - Wall squat: Stand with your back to a wall and lower to a squat position keeping the back in contact with the wall. Hold for 30 seconds (beginning level) to 60 seconds (intermediate to advanced).
- Day 17 - Plie dumbbell squat: Complete a plie squat holding one dumbbell with both hands centered between your legs. Repeat 20 times.
- Day 18 - Walking squats: Begin in a lowered squat position. Maintain this lowered stance as you walk forward 4 steps. Then walk back 4 steps. Lift to standing and repeat 5 times.
- Day 19 - Squat press: Put one dumbbell in each hand and hold them at shoulder height. Lower down into a squat. As you lift, extend the arms over your head, pressing the weights up. Lower the weights as you lower back into a squat position. Repeat 10–20 times.
- Day 20 - Wall squat with weights: Place yourself in a wall squat position and place a weight on your lap. Hold for 30 seconds (beginning level) to 60 seconds (intermediate to advanced).
- Day 21 - Rest
Week Four
During week four of the squat challenge, you're going to add plyometric movements to your squats. These jumps not only build powerful muscles, but they also increase your heart rate so that you burn more fat and calories.
Pro Tip
It's important to practice perfect form when you add air to your squats. If you still feel unbalanced or uneasy doing squats, simply lift to your toes instead of jumping during each repetition.
Week Four Exercises: Boost Power With Plyometrics
- Day 22 - Dumbbell squat with lift: Complete the dumbbell squat but add a boost at the end of the lifting phase so your heels come off the floor. Repeat 20 times. This movement serves as preparation for the jump.
- Day 23 - Squat jump: Complete a squat and add a quick jump at the end of the lifting phase. No weights are used for this variation. Repeat 10–20 times.
- Day 24 - Knee tap squats: Complete a squat jump, but during the jump, try to lift your knees high so that you can tap them with your hands. Repeat 10–20 times.
- Day 25 - Dorothy squats: Complete a squat jump and click your heels together when your legs are in the air. Land in a bent knee squat position and repeat. Repeat 10–20 times.
- Day 26 - Squat jumps (forward): Complete consecutive squat jumps moving forward for 5–10 repetitions. Turn around and complete 5–10 more to your starting location.
- Day 27 - Box jumps: Complete a forward squat jump to an elevated box or stair. Repeat 10–20 times.
- Day 28 - Rest
Final Days
You've made it to the last few days of the squat challenge. Congratulations! You've earned the right to choose your routine during the last two days. Pick any exercise from the series and complete double the repetitions.
- Day 29: Your choice x 2
- Day 30: Your choice x 2
Beyond the 30-Day Challenge
So now that you've completed the squat challenge it's important that you maintain your results—or, better yet, continue to build a tighter, stronger backside.
Add some of these exercises to a balanced workout routine that involves cardiovascular exercise, upper and lower body strength training, and a flexibility routine. By incorporating these three essential types of exercise into your weekly schedule, you decrease your risk of injury and decrease the chances that you'll burn out or quit.